Daikaiju Sokogeki: Ruling Theory

DISCLAIMER: The following is merely an opinion which I hold based on numerous facts and observations.  Whether you agree with me or not, ALWAYS follow the rulings issued by the Head Judge of the tournament you are attending, whether you are judging or dueling.

How long has it been since I wrote something here?  I dunno, but it’s been too long.  Haven’t had the time for this blog, really, but I’ve got time now, and a great topic to discuss.

One of the newest TCG-exclusive archetypes seems to be doing to the meta exactly what you would expect creatures like these to do: Stomp on it.  The Kaiju have risen from the sea  and earth, and descended from the stars to rampage across the tournament scene!  They boast a unique play style, focusing on turning duels into a 1-on-1 giant monster smackdown: You feed one of your opponent’s monsters to a Kaiju and give control of it to them, but this lets you call out a Kaiju of your own for free.  Each Kaiju also has a unique ability that can be used by paying Kaiju Counters, which are accumulated by their perma-class Spell/Trap support.

GODZILLAAAAAA!

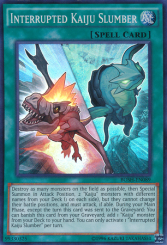
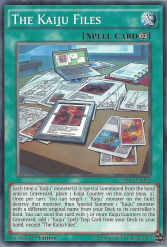
Two cards in particular have given rise to a whole new monster of a ruling problem.  While it has been officially resolved with regards to these two cards themselves, I firmly believe that this new ruling is making waves in the fabric of the rest of the game.  These two cards are Interrupted Kaiju Slumber, and The Kaiju Files.

interruptedkaijuslumber-bosh-en-sr-ue

So, how do we work?

thekaijufiles-shvi-en-c-1e

I ‘unno.

Each of these cards has something in common, an effect which first destroys monsters, then Special Summons Kaiju.  These two events happen sequentially (one after the other), and not simultaneously (at the same time).  The main reason these cards are sending ripples through the game is because the “Kaiju” monsters (please pardon the redundancy) all possess what is unofficially known as a Highlander clause, a condition which prevents more than one of a card or series member from existing on the field (one side or both).  In the case of the Kaiju, the text reads, “You can only control 1 ‘Kaiju’ monster.”  The basic implications of this condition are obvious- you cannot, for example, target a Kaiju with Call of the Haunted if you already control a face-up Kaiju- but this also prevents you from using the first summon condition of most Kaiju monsters to Tribute an opponent’s monster and summon it to their field if they control a Kaiju, even if you intend to Tribute that Kaiju first.

The Kaiju Files is a unique case, though.  Under previously issued rulings, its effect to summon a new Kaiju would be literally impossible to activate.  Because of this, Konami either has to make an exception, a rule change, or a rule clarification.  They never do exceptions without printing the parameters of the exception on the card itself.  This leaves either a rule change or rule clarification.

Before I explore that, I need to point something out: A while back, Julia Hedberg, head of the North American tournament system, confirmed a ruling from Konami of America’s Research and Development Department regarding Interrupted Kaiju Slumber.  They stated that Slumber COULD be activated while one or more Kaiju were face-up on the field.  This was about a month or two before the release of The Kaiju Files, though I suspect Files had already been designed and approved for release.  The timing certainly makes sense.  But what’s going on here?  Is this an exception to the rules, or a change or clarification of the rules?

I don’t think for a second that Files or Slumber are exceptions to the rules.  Konami doesn’t do that without putting it in parentheses on the card itself, and they haven’t done it since long before they introduced Problem-Solving Card Text at the dawn of the Xyz Era.   So does this mean they changed the rules?  Well, that could be the case, but this would mean the FAQ page for Gozen Match and Rivalry of Warlords would need to be rewritten.  It would also mean that cards such as Magical Dimension would also need to be ruled differently.  (Currently, you cannot activate it while Gozen Match is active if the only monsters you can summon have a different Attribute from the ones you control.)  Konami seems to hate changing the rules for older cards (*cough*), and we know they don’t do unwritten exceptions anymore.

But I don’t think this is a clarification.  If Files didn’t target, I would argue that it IS a clarification, but that’s not the case at all.  The Kaiju Files targets the Kaiju that is to be destroyed and replaced, which is essentially the same as Magical Dimension, which targets a monster, Tributes it, then replaces it with a Spellcaster-Type monster.  Yes, yes, I know, Tributing isn’t the same as destroying, but are they really that different?  The end result is the same, it just has a different label.  Tributing is often used as a Cost, sure, but again, so what?  As we’ve seen, Tributing can also be part of an effect INSTEAD of a Cost.  When Tributing is an effect, the only difference it has from destruction is the label.

The reason for the ruling on Slumber was that The Kaiju Files would be released soon, and Konami wanted consistency among the cards in the Kaiju series.  Files works exactly the same way as Magical Dimension.  Konami doesn’t do exceptions anymore without putting them on the card.  Therefore, I contend that the rules have been changed.  It is the only explanation that accounts for… well, everything, including the timing of the rulings and Konami’s past behavior.

Here’s hoping they don’t put an article up on the official strategy blog that says Slumber and Files are exceptions to the rules because “Screw you guys, we’re Konami!”  I think I would throw up.

Sneak Peek Auxillary: Secrets of Eternity

It’s unfortunate that I couldn’t attend the Secrets of Eternity Sneak Peek.  I was really hoping to write another report and analysis from experience like in my previous two Sneak Peek articles.

That said, I’m going to do something else.  I’m going to look at the set and take my best guess at what the sealed event might have been like.

First off, any Sneak Peek sealed event is going to be dominated by common cards, simply because everyone is going to have seven or eight per pack.  The best strategy when building your deck is to use the most generic stuff you pulled, any cards that can work well together, or at least won’t trip each other up.  I also firmly believe one should stick with the 20-card minimum allowed for Sneak Peek sealed tournaments.  Fear of decking out- that is, losing because you must draw a card when you cannot- is not a good reason to use more than twenty cards.

Run the minimum number of cards allowed.  If you draw into what you need sooner, you can get over your opponent faster.

Okay, now.  The actual format.  A full set list of Secrets of Eternity can be found on the Yu-Gi-Oh! Wiki.  Cards will be listed in Konami’s official database after the official release date of the set.

Most of the Performapals were printed as commons in this set, so I would fully expect them to make an appearance.  Most of the commons are pretty handy in this format.  I’m a bit on the fence as to Performapal Spikeagle‘s usefulness since it only gives one of your monsters piercing.  Weighing in at only 900/900 doesn’t really help either.  Performapal Stamp Turtle also doesn’t seem very handy here, but at least it can bump up the Levels of two monsters by one each turn, similar to Constellar Kaus.  The other Performapals are much better here, so I would expect them to see play in many matches.

The Superheavy Samurai don’t make quite as big a showing in this set as they did in the last two.  Only five Superheavy Samurai cards were released in this set, and of those five two were commons.  The other three were Super Rares.  And the commons?  Both of them provide exclusive support to the archetype and wouldn’t be of much use in a sealed event.

Two new Dododo monsters make their TCG debut in this set: Dododo Swordsman and Dododo Witch.  Swordsman is basically the Big Benkei of the set, acting as a wall and potential board-clearer/beatstick.  Witch isn’t that useful on her own, so I would not have expected her to be played by anyone who didn’t also pull Swordsman.

Three of the Infernoids were printed as commons, but I also wouldn’t expect to see them played because of the summoning mechanics employed by the archetype.  All three cannot be Summoned, except by banishing 2 “Infernoid” monsters from your hand or Graveyard for their Special Summons.  Powerful as the effects of Infernoid AttondelInfernoid Piaty and Infernoid Seitsemas are, the requirements to summon them are too situational for sealed play.  A smart player would avoid using them if they didn’t get loaded down with Infernoid monsters and support cards.

Very few other monsters strike me as usable in the common areas.  Toy Knight would open up a few plays if you were behind on field presence, and Raidraptor – Vanishing Lanius could definitely be handy if you pulled at least two.  Since the max-3 rule does not apply in sealed formats, getting loaded down with 4 Vanishing Laniuses wouldn’t be the worst thing in the world.

The common Spells are also severely lacking here.  Only two strike me as even remotely useful in sealed format: Pendulum Shift and Illusion Balloons.  The first lets you target a card in either player’s Pendulum Zone and change its Pendulum Scale to any number from 1 to 10.  This card can easily stop Pendulum Summons, or it can enable huge Pendulum Summons!  To stop one, pick a card and change its Pendulum Scale to be the same or one off from the card in the opposite Pendulum Zone.

The second card, Illusion Balloons, is a bit more useful if you pulled a decent amount of Performapal monsters.  It can only be activated during a turn in which a monster was destroyed while you controlled that monster, BUT it can be activated at any point during that same turn.  You don’t have to play it right when that monster is destroyed!  (Is anyone else reminded of Last Will?)  When you play Illusion Balloons, you excavate 5 cards on top of your deck.  If there are any “Performapal” monsters in there, you can Special Summon 1 of them.  Whether you Special Summon or not, the remaining cards are shuffled back into the deck.

Now the common Traps are where things get interesting… and nasty.  Echo Oscillation can be used to draw additional cards if you managed to get a ton of Pendulum Monsters.  Even just a few can fuel this card’s effect.

The Performapals received two common Trap Cards: Last Minute Cancel and Performapal Call.  I can see both being used by anyone who received a decent number of Performapal monsters.  The first puts all of your monsters in Defense Position, and can even be used without Performapals.  The second can negate a direct attack and add up to two Performapals to your hand from the deck.

Mischief of the Gnomes is a very interesting card.  It’s a very serious Level disruption card, and can even be used twice in a single turn!  If you’re expecting Xyz Monsters, this is a great card to have.

Wall of Disruption… by the God Cards, this thing is amazing.  When your opponent attacks, all Attack Position monsters they control lose 800 ATK for each monster your opponent controls.  800 ATK!  For each monster they control, regardless of position!  So if your opponent has three monsters, two in Attack Position and one in Defense, the two monsters in Attack Position will lose 2400 ATK when you activate this card, while the one in Defense Position is unaffected.  Anyone who pulls this is more than ready for most attacks by big monsters!

The last Trap I want to look at is Soul Strike.  It’s not very useful until the late game, but it’s still pretty handy at that point.  If your Life Points are at 4000 or lower when someone declares an attack involving two monsters battling one another, you can pay half your Life Points to play this card.  Your monster then gets an ATK boost equal to 4000 minus your current LP.  So if you’re right at 4000 when you play this card and you activate it, you would pay 2000 LP, and your monster gains 2000 ATK.  Cool, huh?  To balance this, you’re only allowed to activate 1 “Soul Strike” in a turn.

The Rare cards are the next most influential group in a sealed tournament.  You’re guaranteed one in every pack, even if you pull a Super, Ultra, Secret, Ultimate, or Ghost Rare.  That extra-shiny card will replace a common card instead of a Rare.  There are plenty of Rare cards that would make a nice impact on the game, so let’s have a look, starting with the monsters.

The promotional card, Dragoons of Draconia, is also a Rare card in this set.  It’s a Normal Pendulum Monster, so it has no monster effects, but 1800 ATK and a Pendulum Scale of 2 make up for this.  Its Pendulum Effect won’t have any effect on the game if you don’t end up with more than one copy of this guy, but Scale 2 is reason enough to put it in a Pendulum Zone.

Frontline Observer is a card that I would definitely watch out for.  It has two powerful search effects.  The first is activated in the turn it was Normal Summoned, and lets you add an EARTH Pendulum Monster from your deck to your hand.  Plenty of those about these days.  The second effect can be activated in the End Phase of your next turn if it lives that long.  You Tribute it as a cost and add any EARTH monster from your deck to your hand.  At only 1000 ATK, this would be hard to pull off, but the first effect should be plenty for most players.

Dragon Dowser is a nifty little Wyrm-Type monster that lets you Special Summon an EARTH Pendulum Monster from your deck if it’s destroyed by your opponent and sent to your Graveyard.  The monster you summon is placed in Defense Position and is destroyed at the end of the turn.  A good way to mount a defense, especially since it weighs in at an even 1500/1500.

Two of the Burning Abyss monsters are also worth looking at here: Farfa, Malebranche of the Burning Abyss, and Libic, Malebranche of the Burning Abyss.  Farfa has a solid 1900 DEF and can banish a monster for one turn if it’s sent to the Graveyard.  You can take advantage of this by Normal or Flip Summoning Farfa while you have a non-BA monster in play (yes, this includes face-down monsters).  Use this to temporarily remove a problem, and either go for game or do something else that gets you closer to game.

Libic isn’t quite as useful, but still pretty handy.  If it goes to the Graveyard, you can Special Summon a DARK Level 3 Fiend-Type monster from your hand, but its effects are negated.  If you just need Libic as a wall, or you have a Cagna, Malebranche of the Burning Abyss on you, you can use Libic to play it without it self-destructing when it’s got company.

The only Spell Card I would expect to see is Void Expansion, and that’s solely for its ability to generate Tokens.  There isn’t anything else in the Spell/Trap department for Rares that’s worth running in a sealed event.

Before I move on to Super Rares, I should probably cover the short-print commons.  While these cards are technically common cards, they are actually few in number.  You won’t come across these as often as you will other commons.

First on the list is Marmiting Captain.  The Marauding Captain of ages past was also apparently one of the army chefs.  This retrained version allows you to shuffle a card from your hand into your deck, then draw a new card to replace it.  If the card you draw is a monster, you also get to Special Summon it.

Next up is Legendary Maju Garzett.  I would fully expect anyone who pulled this monstrosity to make good use of it.  It’s massive ATK potential coupled with its ability to inflict piercing Battle Damage make this card a deadly force to be reckoned with in any sealed tournament.  I’d have been extra careful around this thing.

Extra Net is another short print card, but I wouldn’t really expect to see it very much in a Secrets of Eternity sealed tournament.  If a player Special Summons any monsters from the Extra Deck, the OTHER player gets to draw 1 card.  I might side it in if I find my opponent can make good use of Pendulum Summons, but don’t really see a lot of other uses in this format.

The last short print is Double Trap Hole.  I’m pretty sure this card was designed to be anti-Shaddoll and anti-Pendulum, but I doubt it would have much use in a sealed format.  Basically, it banishes any monster or monsters that your opponent Special Summons in Defense Position.  After looking at everything else in this set, I wouldn’t see this card as very useful in sealed.

Now for the Super Rare cards.  When it comes to the higher rarities, you have to bear in mind that most of them are designed to help existing archetypes that are topping in Tier 2 events.  Even if you DO pull one in a sealed event, don’t expect it to be very useful in that event.  And if it is useful in sealed, chances are it won’t be great anywhere else.

First up is Satellarknight Rigel.  A Level 4 monster with a whopping 1900 ATK is actually pretty handy here.  He also has the added effect of boosting another “tellarknight” monster’s ATK by 500 points, but that monster is sent to the Graveyard in the End Phase.  Because the effect is optional, Rigel makes a great beater, and can also be used as a one-time out to bigger threats.

Infernoid Antra might be one of the few Infernoids to be played in a sealed event, if not the only one at all.  It’s easier to summon than most other Infernoids, only requiring that you banish 1 Infernoid monster from your hand or Graveyard.  It has a solid 2000 DEF and the ability to return 1 face-up card your opponent controls to the hand once per turn.

We’ll skip the Superheavy Samurai cards and Jinzo – Jector because they aren’t that useful in this sealed format.  The next card we’ll look at is Skilled Blue Magician.  Neither of its effects are going to be useful here, but it has pretty good stats at 1800/1800.

Lightning Rod Lord is Konami’s latest abomination in their line of “You can’t play Yu-Gi-Oh!” cards.  It’s a Level 4 Thunder-Type monster with 1800 ATK and an effect that would make even the pettiest of the Greek gods call foul.  “Neither player can activate Spell Cards during Main Phase 1.”  No doubt whoever came up with this card and Denko Sekka is getting a raise for helping to maintaining the current control format.  Now, unless my 20-card deck seemed especially reliant on Spells, I wouldn’t worry too much about this thing.  But if Spells are my only way out of a bad situation, you can bet I’ll be putting a lot of effort into killing this thing so hard, it’ll be in the Graveyard at the start of Game 2.

The only other Super Rare monster worth looking at is Qliphort Cephalopod, and that’s solely because you can Normal Summon it as a Level 4 monster with 1800 ATK, and it’s unaffected by effects of monsters whose Level or Rank is lower than Cephalopod’s current Level.

I would not expect to see any of the Spells or the Trap from the Super Rare cards.

The Ultra Rare cards are even harder to acquire, obviously.  However, this does NOT mean you should discount them.  Even in a sealed event, Ultra Rares can and will appear, and can have a huge impact on the game.  Let’s look at the ones from this set.

Swordsman of Revealing Light is a new spin on an old card and makes an excellent blocker.  Not quite the caliber of Gorz the Emissary of Darkness, but still powerful if you pull it.  It can not only intercept a direct attack, but will destroy the attacking monster if that monster’s ATK is lower than the Swordsman’s 2400 DEF.

Caius the Mega Monarch is the newest in the line of Konami’s Mega Monarch series, and this one is a doozy.  As with each Mega Monarch, it can be Tribute Summoned with only 1 monster, provided that monster was also Tribute Summoned.  If you Tribute Summon it, you can banish 1 card on the field and deal 1000 damage to your opponent- regardless of whose card it was!  If the card you banished was a DARK monster, you also get to banish every other copy of that card your opponent has that isn’t on the field.  Yes, Extra Deck too.  And on top of all this, you can target 2 cards instead of 1 if you used at least one DARK monster for its Tribute Summon.

Infernoid Harmadik is another banish-1 Infernoid monster, making it easy to summon as well.  It has 1600 ATK, pretty average here, and the ability to destroy any monster on the field once per turn.  Not too shabby!

Qliphort Stealth is another Ultra Rare card, but I still wouldn’t play it myself if I didn’t also pull Cephalopod or Monolith, except as an 1800 beater.Just doesn’t seem worth it in a sealed format.

There’s a Level 6 Synchro called Metaphys Horus with pretty generic conditions- 1 Tuner + 1 or more non-Tuner monsters.  If you got a Tuner and this card, go ahead and run them because it’s a pretty solid monster.  If you use a Pendulum Monster to as Synchro Material, you even get to use two of its effects instead of just one!  Awesome, right?

A Rank 2 Xyz Monster made it into the Ultra Rares.  It’s called Sky Cavalry Centaurea.  It has 2000 ATK and can’t be destroyed by battle so long as it has Xyz Material.  Now, I know what you’re thinking: There has to be a Tiras-like downside, right?  Nope.  The only time you detach Xyz Materials from it is when you activate its effect after it battles another monster- and activating this effect is COMPLETELY optional!

The lone Trap Card among the Ultras is Eye of the Void, but all it does is let you summon an Infernoid for free while its effects are negated for that turn.  Not that big a threat if that player didn’t also pull a really good Infernoid.

Finally, the Secret Rare cards.  Remember what I said about not discounting Ultras just because they’re hard to get?  Yeah, same thing applies here.

Honestly, though, there are only four Secret Rare cards that could be any kind of useful here.  The first is Qliphort Monolith, and that’s solely because it’s a 2400 ATK monster.  Not much else going for it in sealed, really.

Next up is the great Pokemon reference, A Wild Monster Appears!  This would actually make a lot of unplayable monsters you pulled pretty useful since it can summon one from your hand, ignoring its summoning conditions.

Pot of Riches is next, and is great Pendulum support.  If you get this and a decent number of Pendulum Monsters, it’s a good idea to run it in your Main Deck.  If not, oh well.

Soul Transition is the last of the useful Secret Rares for sealed format.  If none of your monsters were Special Summoned, you can Tribute 1 face-up Level 4 monster that was Normal Summoned or Set to draw 2 cards.  Its two downsides are that you can only play 1 copy of Soul Transition per turn, and you cannot Special Summon in the same turn.

Overall, this set seems pretty balanced between attack and defense, so I’d expect a lot of back and forth action here.  There’s also a few control elements, so the clever players would likely rise to the top.  Lucky pulls will also have a huge influence on the outcome, as always.

The point of this article is to show you that you can still analyze the cards in a set and be prepared for a sealed tournament.  Be prepared.  Know what to expect and build your deck accordingly.  Go for cards with generic effects first and foremost, and then use support cards if you have a ton of cards from that series, such as Performapals.

No way I’m going to miss the next Sneak Peek.  Cover monster of Crossover Souls is called Clear Wing Synchro Dragon, and anyone who knows me knows how much I love Synchro Monsters.  Until next time, play fair, and have fun!
Principle Rules

I’m still in the process of writing the articles about stat modifiers and cards that ignore summoning conditions.  Speaking of conditions, I’ve also been dealing with a nasty cold-thing, so I’m going to take a a break- what else is new, right?- and talk about something that I feel needs to be addressed.

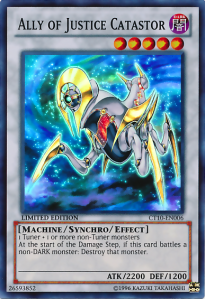
Okay, so, a while back I wrote an article discussing the interaction between Neo-Spacian Grand Mole and Ally of Justice Catastor.

'Sup?

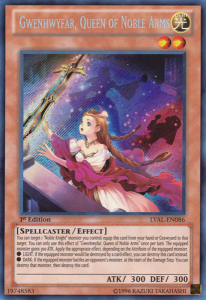
Two weeks ago I had to handle a ruling that wasn’t quite as cut-and-dried as one player thought it would be.  He had a Neo-Spacian Grand Mole face-up and had declared an attack with it on a Noble Knight Borz, who was equipped with Gwenhwyfar, Queen of Noble Arms.

Hey.

Now, my friend was confident that he had this in the bag.  He had called me over and asked me the question that I answered in that article: Which one wins, Catastor or Mole?  Now, we all know that the answer is Grand Mole, but he forgot WHY it wins.  This ended up costing him the duel, and thus the match.

It isn’t just some rule that Mole always wins, now stop asking questions.  It isn’t because effects that return cards to the hand defeat effects that destroy.  Grand Mole beats Catastor because he’s optional and Catastor isn’t.  This means Catastor has to go on Chain Link 1, while Mole goes on Chain Link 2.  Chains resolve backwards, so Mole gets to do his thing first.  Compulsory effects always go on the Chain before optional effects, regardless of the turn.

That is not at all what would happen in a match-up against a DARK Noble Knight and Gwenhwyfar.  At least, not on Grand Mole’s controller’s turn.  Remember how I said that Mole’s effect is optional?  Well, if Gwen’s equipped to a DARK monster, she has an effect that looks a lot like Ally of Justice Catastor‘s, but with one big difference: Gwenhwyfar’s version is also optional.  When two optional Trigger or similar effects collide and have to go on the Chain, the Turn Player’s effect takes the first Chain Link, then the other player’s effect is Chain Link 2.  As a result, Grand Mole actually loses this fight.

I tell you this story not to illustrate a point about a rule- although you really should be studying SEGOC if you’re not already- but to give you a new tool to use when thinking about how the game works.  Don’t think of specific situations and then try to apply them universally.  Instead, understand the principles of the game itself, the “why” behind what happens in those situations.  Having cards and situations on-hand as examples might be helpful sometimes, but they can become a pitfall if you become too reliant on them.  General principles are your greatest allies in understanding the game.

Allow me to give you a few principles that will help you understand things better.

  1. Do your best to understand Problem-Solving Card Text, or PSCT.  There are principles behind it, and knowing them will allow you to read your cards and any you face with full understanding of their effects.  Read these articles on Konami’s official strategy blog to learn more about PSCT.
  2. Learn what SEGOC means, then learn what this ruleset is.  Fully understanding SEGOC can be an incredible strategic weapon.  There are no official articles about it that I know of, so the SEGOC Wikia page will have to do.
  3. Study older cards that haven’t been reprinted.  Yes, there are plenty of those still in the game.  Read their texts and study the rulings archived on the Yu-Gi-Oh! Wikia.  Find players who’ve been around to see these cards in action and see what they can teach you.  You might start to learn a few things you can use later on.  Those who do not learn from history aren’t necessarily doomed to repeat it in Yu-Gi-Oh!, but history will come back to kick your butt if you don’t keep an eye on it.
  4. Keep yourself well fed and well rested.  The first three principles are all well and good, but they won’t do a thing for you if your brain is overworked and low on energy.  We’ve all been there, losing a match because you were too hungry to read a card properly.  Happened to me just a few weeks ago, in fact.

Remember this, because it’ll be more helpful than anything else: Cards come and go in the tournament scene, but the principles behind how they work will always be the same.  Focus your understanding of the rules on these principles and you will almost never be wrong.

Actually, no, that’s only the second most helpful thing I’ll ever tell you.  The number one, most important, most useful, most helpful principle I can teach you is this: READ YOUR CARDS!

Heh.  Just remember to understand the principles of the game and understanding the cards will come easily.

Good luck in your future duels, everyone.  And stay tuned, because this weekend is the Secrets of Eternity Sneak Peek event, which means another Sealed Strategy article!

Prohibiting the Game

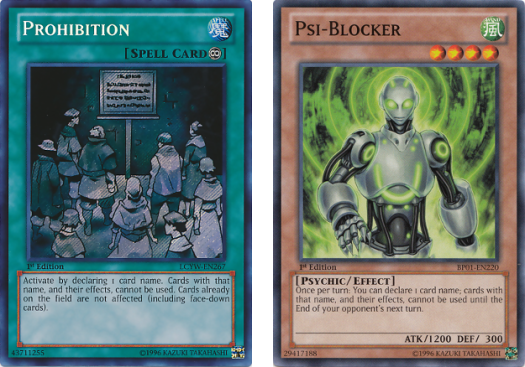
In spite of the efforts of Konami in both the OCG and TCG territories, there are still a great many problems with the game, but they usually come down to a few widely used cards.  Today, I will be discussing two very similar cards, one of which is almost a staple in Side Decks, and may become a Main Deck mainstay for the “tellarknight” series.  Meet Prohibition and Psi-Blocker.

Prohibition and Psi-Blocker

Attention, citizens: Hot sauce is now prohibited in all territories.

Both of these have basically the same effect: You declare the name of a card, and starting from when the card/effect successfully resolves, neither player can use cards with that name, or their effects.  The only BIG differences between the two are that Psi-Blocker‘s effect only lasts until the end of your opponent’s next turn, whereas Prohibition applies as long as it remains face-up; and that Psi-Blocker will affect cards that are on the field when the effect activates.  This doesn’t have much to do with what we’ll be talking about today, however.

So what ARE we talking about?  Well, before I go any further I should define the word “use” that is in the text of these two cards.  So what does it mean?  Well, I’ll have to redirect you elsewhere for now.  A while back, Judge Alex Gravely wrote up a list of stuff you can and cannot do with Prohibition and Psi-Blocker, and it has been compiled on this here blog.  Go have a look at it real quick.  I’ll wait.

You back?  Good.  The list seemed pretty straightforward, didn’t it?  Well, there are situations where that list isn’t really going to help you much.  Every single one of those involves cards that change their names while they are on the field.  A few examples include Harpie QueenProto-Cyber Dragon, and Elemental HERO Prisma.

Okay, so Prisma isn’t that hard to figure out.  Once his effect has resolved and his name is changed to that of the prohibited card, he cannot be “used” until the effect wears off, or his name changes by some other means.  This is assuming that Prohibition was activated before Prisma was put onto the field.

But what about Harpie Queen or Proto-Cyber Dragon?  These are actually a bit harder to figure out.  In fact, there are two completely different rulings on the matter.  (Since it’s more popular in the tournament scene, we will discuss Harpie Queen throughout the rest of this article.)

According to TCG rules, if Harpie Queen is Summoned to the field after Prohibition has been activated and Harpie Lady was declared, then her effect that change her name will not apply.  She is still Harpie Queen, and thus can be used like any other card.

The Official Card Game, or OCG, which is played in Asian territories like Japan, states pretty much the opposite.  A Harpie Queen Summoned to the field will apply her effect to change her name to Harpie Lady, and thus cannot be used.

So why the difference?  That I can’t tell you.  I still can’t figure out why, after all these years and the proven popularity of the game, Konami has yet to fully eradicate the differences in the two versions of the game.  Maybe they haven’t been able to get to it yet.  I hope this is the case.  I like to give people the benefit of the doubt.

What I can tell you are my theories about the rulings themselves, the reasoning behind them.

Here’s what I think about the TCG ruling.  I think that the reason Harpie Queen would not apply her effect to change her name is because it would cause an uncontrolled loop that would change nothing in the game.  You see, her name changes.  Prohibition then says, “Nope, you’re a Harpie Lady now, so you can’t use your effects!”  So the effect stops applying and she’s now a Harpie Queen again.  Prohibition then stops applying to her, her effect reapplies and… you get the idea.  To prevent this from happening, the ruling is that the thing which starts the loop in the first place, the effect of Harpie Queen to change her name to Harpie Lady, is not allowed to apply at all.  Makes sense, if you ask me.

Now, what about the OCG ruling?  Well, I HAD a theory, but it stopped making sense when I thought it through a bit more.  I originally thought it had to do with original names, like the Hero Mask rulings on Fairy Archer and The Wicked Avatar, but looking back at the Elemental HERO Prisma ruling, I see now that it doesn’t make any sense.  If you change Prisma’s name to the name of the prohibited card, Prisma can’t be used until his effect wears off.  At this point, I really don’t know.

What’s more, this isn’t the only ruling that is different from the TCG.  I honestly don’t know what to make of this anymore.

When it comes down to it, I advise Judges to use the TCG rulings.  They may be “previously official” according to the Yu-Gi-Oh! wiki, but they still apply until something else from Konami overrides them.

That about wraps this up.  Still to come, an article discussing ATK/DEF modifiers, and my new theory of why Level Modulation can only summon certain monsters if they were first summoned properly!  Stay tuned and keep dueling!

Sneak Peek 2: The New Challengers

Today I was able to participate in yet another Sneak Peek at my local store.  The New Challengers will be making its official release in the US on November 7th.

Same as the last Sneak Peek, participants received a world premier promotional card and five booster packs, containing nine cards each.  Any regular readers will remember my previous Sneak Peek article and how I went over the rules regarding the sealed format rules.  For those just joining us and those who have forgotten, here’s a quick refresher.

1) Each player receives five 9-card packs and one promotional card- 46 cards total with which to build their decks.  You are NOT allowed to trade, sell, or give away your cards until the tournament is finished, or unless you drop from the tournament.

2) The minimum number of cards your deck can contain is 20 cards instead of the usual 40.  All Fusion, Synchro and Xyz Monsters you receive are placed in the Extra Deck, though I imagine you can put them in the Side Deck if you want.  Pendulum Monsters are placed in the Main or Side Decks.  The 3-card limit does NOT apply.

3) All cards you do not put into your Main or Extra Decks are put into your Side Deck.  The 15-card limit does NOT apply for this tournament.  Your Side Deck can contain as many cards as you like.

4) Most Side Deck rules apply, meaning you can use your Side Deck in between Duels, but with one major exception: You can actively modify your deck by increasing or decreasing its size (but you cannot go below 20 cards in your Main Deck), or by exchanging cards entirely.  You do not have to “un-Side” after a Match.

Now, without further ado, let’s get to the deck list and strategy!  This month, I was as poor as dirt, but thanks to my good friend Bryson over at the YouTube channel Meta Makers, I was able to enter the tournament.  Be sure to give his channel a look-see, Like his videos, and subscribe to his channel!

First, the deck list.

Main Deck: 20
Monsters: 15
1x Lancephorhynchus
2x Elegy the Melodious Diva
2x Lindbloom
2x Serenade the Melodious Diva
1x Performapal Cheermole
1x Performapal Trampolynx
1x Ruffian Railcar
1x Satellarknight Betelgeuse
1x Scrounging Goblin
1x Shaddoll Hound
1x Superheavy Samurai Soulbang Cannon
1x Superheavy Samurai Soulshield Wall

Spells: 3
1x Celestia
1x Magical Star Illusion
1x Wonder Balloons

Traps: 2
2x Punch-in-the-Box

Extra Deck: 2
1x Frightfur Bear
1x CXyz Barian Hope

Side Deck: 24
2x Block Spider
2x Fluffal Cat
2x Shogi Lance
1x Deskbot 002
1x Fluffal Owl
1x Fluffal Rabbit
1x Gogogo Goram
2x Hexatellarknight
2x Oracle of the Herald
1x Laser Qlip
1x Mimiclay
1x Toy Vendor
1x U.A. Powered Jersey
1x Xyz Change Tactics
2x Yang Zing Brutality
1x Different Dimension Encounter
1x Performapal Revival
1x Qlipper Launch

As you can probably tell, the deck was much harder to put together this time around.  Much of my strategy actually focused on defense rather than attack.  But that’s not to say I didn’t attack at all.  If anything, I took a leaf out of the Superheavy Samurai book and turned my defense INTO my offense.  The key card in this strategy was Lindbloom, a new Wyrm-Type monster with a very interesting Trigger effect: During any damage calculation in which one of your monsters is battling an opposing monster, each monster’s ATK is changed to match its current DEF.  As an example, Lindbloom has 0 ATK, but 1800 DEF.  If it attacks a monster or is attacked by a monster, its ATK will become 1800 until the end of the Damage Step.  This powerful ability allowed me to turn many of my high-DEF monsters into heavy beaters that I could use to get around most other monsters.  The one major weakness of the effect was that my opponent could use their own high-DEF monsters to turn the effect against me.  But more often than not, I was actually prepared for that.

Using my DEF to fight wasn’t my only tactic, however.  Unlike in the last Sneak Peek, I was actually able to perform a Pendulum Summon!  By using the Scale 4 Performapal Trampolynx, and the Scale 7 Lancephorhynchus, I could Pendulum Summon one or both copies of the Level 5 Elegy the Melodious Diva.  This in turn would let Elegy use her effect to give all Fairy-Type monsters I control +300 ATK.  If both copies of Elegy hit the field via Special Summon, that wound up being a +600 boost for my Fairies.

Comboing off the Pendulum Summon, I would use Trampolynx to return Lancephorhynchus to my hand so that I could Tribute Summon it.  2500 ATK is nothing to scoff at (if you don’t have a Lindbloom, of course).  And if I had Performapal Cheermole in my hand, I could put it in the newly-emptied Pendulum Zone so that Lancephorhynchus its own +300 ATK boost.

Ruffian Railcar and Shaddoll Hound were put into the deck primarily for their Attack Points, 1800 and 1600, respectively.  Railcar had the added bonus of a damage effect I could use on the first turn of the duel at no cost to my turn, or in any situation where attacking would be unwise.

The two Superheavy Samurai Soul monsters definitely warrant an explanation.  I used them primarily for Soulbang Cannon‘s effect, a sort of last-ditch effort if I ever needed to get rid of some problem cards.  If my opponent had a card whose effect activated in the Battle Phase- such as Lindbloom– I could negate that effect’s activation and destroy that card, along with every monster on the field.

The Spells were present to help me gain any kind of advantage over my opponent’s monsters’ ATK.  The Field Spell Celestia, for instance, would turn Lindbloom into a 2100 ATK beater.  Magical Star Illusion was also quite handy, especially against a field full of Set monsters.  My opponent must have at least the same number of monsters as me, but they don’t have to be face-up!

The third Spell, Wonder Balloons, deserves its own paragraph.  This card proved nightmarish in this format.  Without Lindbloom to override it, Wonder Balloons would often spell doom for your opponent.  Once each turn, you can feed it any number of cards from your hand to give it the same number of Balloon Counters.  Each Balloon Counter would take away 100 ATK from your opponent’s monsters.

The only two Traps I used in the Main Deck were two copies of Punch-in-the-Box.  Quite frankly, this card is amazingly nasty, and nastily amazing.  When your opponent attacks while they have at least 2 monsters, you can send a different monster on their field to the Graveyard, then drop the attacking monster’s ATK by the sent monster’s ATK in the Graveyard.  Does this card target?  Yes.  It targets the attacking monster.  What about the other monster?  Does it get targeted?  The answer to that is a resounding NOPE!  You do NOT tell your opponent which monster you’re stuffing into that spring-loaded boxing glove until you actually resolve the effect of Punch-in-the-Box.  Oh, and one more thing: It “sends” to the Graveyard.  It doesn’t “destroy” the monster, meaning a lot of anti-destruction effects will not work against it.  For example: Stardust Dragon.  There is one thing I noticed about this card, though: While you can certainly choose any monster to send to the Graveyard, the ATK decrease is dependent on that monster actually REACHING the Graveyard.  If you choose to get rid of a Pendulum Monster, it will NOT go to the Graveyard, instead going to the Extra Deck.  In that case, the attacking monster loses no ATK.  Ditto any field with Macro Cosmos or similar cards in play.

The Extra Deck…. this was actually more useless than the last Sneak Peek.  At least I had the means to summon Pilgrim Reaper and Cloudcastle.  But a Fusion Monster without the proper Fusion Materials, and a Rank 7 Xyz Monster, well…. let’s just say those cards were only present as a formality.

I didn’t once use my Side Deck in this tournament, though I had given it consideration on many occasions.  Most of the cards were useless to me, but I did ponder using most of the monsters, except for Shogi Lance.  I had only considered using Mimiclay and Toy Vendor.  I hardly even thought about using any of the Trap Cards, and when I did, I only considered Different Dimension Encounter and Performapal Revival.

I ended up taking 3rd place in the tournament.  It wasn’t exactly my best day, though.  I had an awful crick in my back- still present as I write this- which made concentration difficult.  I also couldn’t remember some essential rulings with regards to ATK modifiers like Lindbloom and Wonder Balloons.  This and a balloon-based stall strategy cost me the first round.  The next two I won with some effort, though.  The fourth and final round, however, was sheer luck, plain and simple.  I got paired against the one guy who pulled Herald of Ultimateness.  And wouldn’t you know it, the Ritual Spell was a COMMON.  Short of depleting his hand and using Superheavy Samurai Soulbang Cannon, there was no way I would have won against that…. but his wife showed up and he decided to drop and go home, giving me the win.  I have no doubt in my mind that I would have lost, though.  I’m not going to pretend I could defeat Herald of Ultimateness.

I still ended up with a mat, though.  So I’m pleased.

I’m going to go ahead and wrap this article up, folks.  However, you should know that I’ve got two more articles in the works!  The first will be discussing Prohibition and how it interacts with cards like Harpie Queen.  The second will be a (hopefully simple) guide to ATK/DEF modifier effects.  I’ll also try to do a few card reviews if I can get the time to research some of the more interesting cards in The New Challengers.

Until next time, Duelists!  Duel fair and have fun!

UPDATE: Deck list now has links to the cards on the official database!

On the Nature of Targeting

At last week’s local tournament, a situation came up in the Top 4 where I gave a ruling that made one of the players not very happy.  He actually ended up losing because of it.  Don’t get me wrong, he was a good sport about it, and we all laughed about it later, but it was an odd ruling- although one I found quite funny.  It was Madolche Queen Tiaramisu vs. Battleguard Howling.

The Madolche player activated Tiaramisu’s effect, returning two “Madolche” cards from his Graveyard to his deck, letting him also return two of his opponent’s cards to the deck, one of which was a Warrior-Type monster.  His opponent tried to activate Battleguard Howling.  I saw this happen and stepped in.  Battleguard Howling activates when a Warrior-Type monster you control is targeted by an opponent’s monster effect or attack by targeting 1 face-up opposing monster.  It inflicts damage to your opponent equal to the original ATK of that target, and returns that same target to the hand if the damage was successful.  However, Madolche Queen Tiaramisu’s effect only targets two “Madolche” cards in the Graveyard; it does NOT target the opponent’s cards that are returned to the deck.

I’ve mentioned targeting on this blog on several occasions, but I’ve never really discussed what it is or how it works.  Today, I dive into that.

What IS targeting?  As a noun (a person, place or thing), it is “a person, object or place selected as the aim of an attack.”  As a verb (an action), it means to “select as an object of attention or attack.”  Both definitions work in the appropriate context in the Yu-Gi-Oh! TCG.

When dealing with attacks, you first declare your attack with a monster, then you select the monster it will battle.  This is called “targeting for an attack”.  An “attack target” is the monster chosen to be attacked.  Pretty simple and straightforward.

Targeting with card effects is trickier to understand.  Many older cards that target still have not been reprinted.  Even with newer cards, targeting is often a concept that escapes many good duelists.  Older cards will use the term “select” if they have not been reprinted with Problem-Solving Card Text.  But any card printed or reprinted after the release of Xyz Monsters will use the word “target”.

So how does targeting work with card effects?  It’s actually an activation condition, similar to a Cost.  When you first activate the card or effect, you play the card face-up on the field, or announce that you are activating its effect if it’s already face-up (though some effects activate in other locations).  Then you fulfill its conditions.  Targeting and costs are always listed toward the beginning of the effect, and end in a semicolon (this thing ; ).  Once the card’s Costs have been payed (if any) and its targets declared (if any), your opponent (and then you if they pass) is allowed to Chain to that effect with their own cards.  Players repeat these steps for any card or effect that is activated.

  1. Declare activation of the card or effect
  2. Follow activation conditions (paying Costs and declaring targets), if any
  3. Opponent is given the opportunity to Chain to the effect (though they may pass to you)

Once you and your opponent have BOTH passed on adding to the Chain, you resolve that Chain.  This means that you carry out the actual effects of each card on the Chain, starting with the LAST card activated.  So if three cards were all placed on the same Chain, you start with Chain Link 3 and work your way down to the first card played (Chain Link 1).  If a card targeted something, resolution of the effect is when that target is affected.

Madolche Queen Tiaramisu is a bit of an odd duck.  She possesses an effect that both targets and does NOT target.  Let me explain: To activate her effect, you must detach 1 Xyz Material from her (that’s the Cost), then target 1 or 2 cards in your Graveyard that have “Madolche” in their names.  When Tiaramisu’s effect resolves, any of those targets that are still in the Graveyard are shuffled into your deck (if you targeted two cards but one is banished by D.D. Crow, the remaining target still returns to your deck), then it shuffles up to the same number of cards (once again, a minimum of 1; this means if your opponent has an empty field, you cannot activate Tiaramisu’s effect, since returning opponent’s cards to the deck is mandatory (does not contain the words “you can”)).

The cards you choose to return from your opponent’s field to the deck, however, are NOT being targeted.  The reason why is simple: Tiaramisu’s effect doesn’t tell you to choose those cards when it tells you to choose the “Madolche” cards in your Graveyard.  What this means is that you choose those opposing cards when Tiaramisu’s effect resolves.

Since that Warrior-Type monster was chosen during the resolution of an effect and not at that effect’s activation, it was not “targeted”.  And because it wasn’t targeted, Battleguard Howling could not have been activated.  A ruling I found quite funny, mostly because it reminded me of Trishula, Dragon of the Ice Barrier.

Let me divert into a short history lesson.  Before the advent of PSCT, knowing whether or not a card targeted was a bit difficult to figure out.  When Trishula was released in January, 2011, it caused a LOT of confusion because it appeared to target.  But it didn’t target at all, and the reason why was hilarious to me.  The card to be banished from the hand is chosen at random, but cards cannot be “targeted at random”, so that card has to be chosen when Trishula’s effect resolves, not when it activates.  What made it funny was that the other two cards had to be chosen at the same time as the card from the hand, so Trishula didn’t target THEM either.  Even if you didn’t want to banish a card from the hand, it didn’t matter.  No matter how many cards you wanted to banish, you had to choose during the effect’s resolution.  Meaning your opponent had to second guess you if you had more than just three cards to banish, something I found very funny indeed.

Targeting has always been a rather tricky beast, but PSCT finally tamed it.  You can read a more detailed explanation of targeting here.

As always, I hope this article was helpful and enlightening.  Keep dueling, folks.  Until next time!

Big Benkonfusion

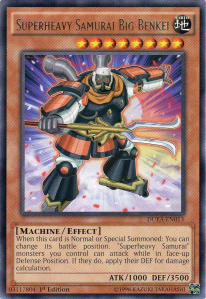
Duelist Alliance officially goes on sale today!  This means that a ton of new and surprisingly good cards are now available for tournament play, such as Chain Dispel, and Yuya Sakaki’s Ace monster Odd-Eyes Pendulum Dragon.  But this post will actually be about different card, one that is sure to cause some confusion.  Say hello to Noboru Gongenzaka’s Ace monster, Superheavy Samurai Big Benkei!

SuperheavySamuraiBigBenkei-DUEA-EN-R-1E

When this card is Normal or Special Summoned: You can change its battle position.  “Superheavy Samurai” monsters you control can attack while in face-up Defense Position.  If they do, apply their DEF for damage calculation.

Older players will immediately be reminded of two older cards: Total Defense Shogun, and Elemental HERO Rampart Blaster.  Both of these cards also have the unique ability to attack while in Defense Position, but there is a key difference between these cards and Big Benkei up there.  The difference is that these cards still use their ATK when attacking in Defense Position, but Big Benkei (and all other Superheavy Samurai in his presence) uses his DEF.

This is where I got hung up, and I don’t doubt a lot of other players experienced the same confusion as me.  What happens if Superheavy Samurai Big Benkei attacks a monster with less ATK or DEF than his own DEF while he’s in Defense Position?  There are two possible answers to this question.

The first possible answer is Big Benkei deals battle damage if the attack target is in Attack Position, but does not destroy it by battle.

The second answer is that Big Benkei will inflict battle damage if the attack target is in Attack Position, but WILL destroy the monster by battle either way.

Only one of these is correct and some of you will be surprised to learn that it’s NOT the first one.  Yep, you read that right.  Big Benkei and his Superheavy allies can and will destroy stuff by battle while attacking in Defense Position, even though they are applying their DEF.  So why is that?

It’s because they’re attacking.  The rules of the game says that a monster can only attack while in Attack Position, and that you apply that monster’s ATK for damage calculation.  Big Benkei bypasses both of these rules, but the one fundamental factor of battle remains unchanged: One monster is attacking, and attacking monsters can destroy other monsters by battle.

It can’t be that simple, can it?  It can.  The rulebook uses the following phrases when detailing the rules for battling.

Each face-up Attack Position monster you control is allowed 1 attack per turn. (Version 8.0, Pg.32)

You calculate Battle Damage based on the battle position of the monster you are attacking. If you attack an Attack Position monster, compare ATK vs. ATK. If you attack a Defense Position monster, compare your monster’s ATK vs. the attacked monster’s DEF.  (Version 8.0, Pg.35, emphasis added)

In addition to that, the first two sections for calculating damage on pages 35 and 36 (Version 8.0) are labeled as follows.

When You Attack an Attack Position Monster (Version 8.0, Pg.35)

When You Attack a Defense Position Monster (Version 8.0, Pg.36)

Finally, the section on direct attacks is as follows.

If there are no monsters on your opponent’s side of the field, you can attack directly. The full amount of your attacking monster’s ATK is subtracted from the opponent’s Life Points as Battle Damage. (Version 8.0, Pg. 36)

What Superheavy Samurai Big Benkei does is essentially rewrite those sections so that you are applying your monster’s DEF instead of ATK.  Nothing else is changed, so everything else about those rules is still applied.  This is a handy way to remember this rule: Just substitute “your attacking monster’s ATK” in the rulebook with “your attacking monster’s DEF”.  Suddenly, his effect is so much easier to understand.

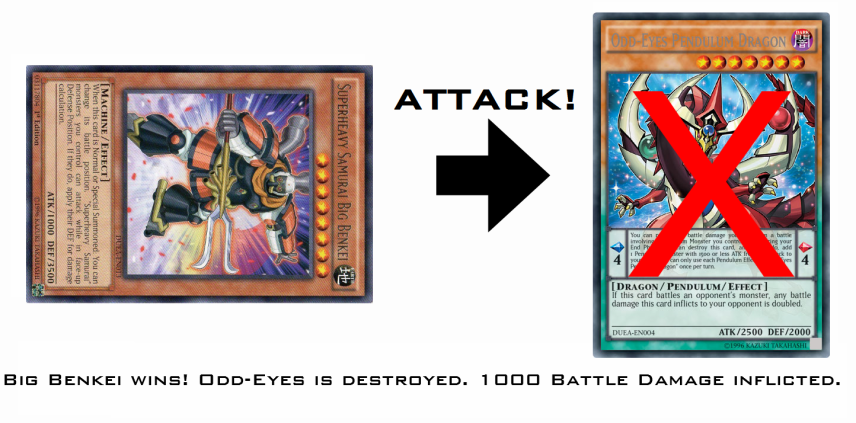
But for those who still don’t quite get it, let me just illustrate it for you.  Let’s say you control Big Benkei in Defense Position, while your opponent controls Odd-Eyes Pendulum Dragon (2500 ATK).  If you attack Odd-Eyes with Big Benkei, Odd-Eyes will be destroyed by battle, and your opponent will take 1000 battle damage.

Benkei vs. Odd-Eyes 1

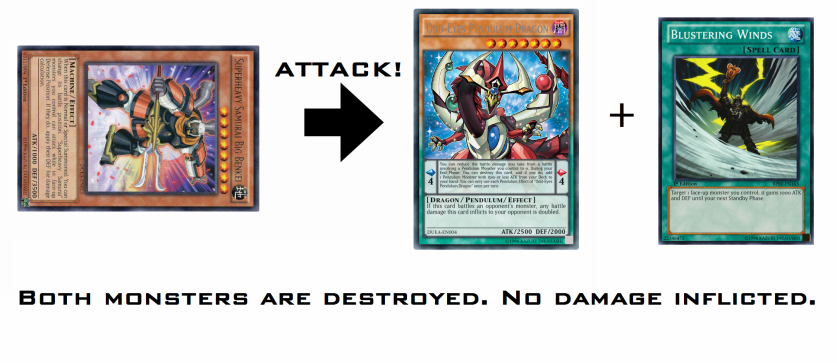
Now let’s say Odd-Eyes has a boost from Blustering Winds.  This puts its ATK at 3500, exactly equal to Big Benkei’s DEF.  If a Defense Position Superheavy Samurai Big Benkei were to attack Odd-Eyes in this situation, both monsters would be destroyed by battle.

Benkei vs Odd-Eyes 2

Well that covers attacking monsters in Attack Position.  But what about monsters in Defense Position?  How does that work?  Pretty much the same way.  If Big Benkei attacks a Defense Position monster with lower DEF than his own, while Benkei himself is in Defense Position, that monster is destroyed, but no battle damage is inflicted.

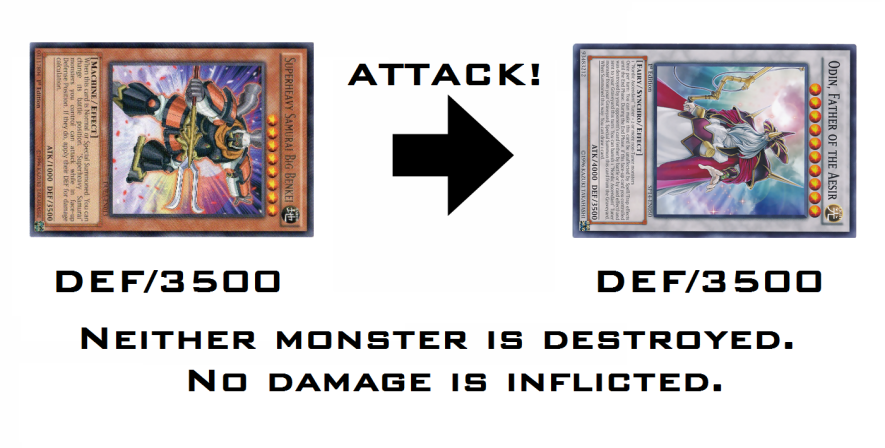
And what if he attacks a monster with the same DEF?  Surely both monsters would be destroyed, right?  Nope.  If he attacks a monster with equal DEF to his own, Big Benkei will be unable to destroy it.  In fact, neither monster is destroyed, and no damage is inflicted.

Benkei vs Odd-Eyes 2

By now, you should have an idea of how this works, but just in case, I will cover one last scenario: If Big Benkei attacks a Defense Position monster whose DEF is higher than his own, neither monster is destroyed, but Big Benkei’s controller will take damage equal to the difference in DEF.

So to summarize once more, when attacking with Defense Position “Superheavy Samurai” monsters while Superheavy Samurai Big Benkei is on the field, just follow the charts on pages 35 and 36 of the rulebook (Version 8.0 as of this writing), using your Superheavy Samurai’s DEF in place of its ATK.

The Superheavy Samurai will be receiving more support in The New Challengers, slated for TCG release on November 7, 2014, so hang in there guys!  In the meantime, I’ll keep looking for stuff to write about.  I’ve already got a particularly interesting idea I’ll be working on, but I’ll keep the details to myself for now.  But if you have any suggestions, then let me know in the comments or by emailing me.

Until next time, keep dueling!

Sealed Strategy: Sneak Peeks

For my newest article, I’d like to focus on something else: Strategy.

This past weekend was the Duelist Alliance Sneak Peek event. At my local store, I participated instead of judging. I’m proud to say that I won the sealed event and earned the prized playmat.

But how I won may come as surprise to many of my readers- it certainly surprised many of the people I defeated, and they are some of the best friends I’ve ever had. You see, I didn’t get very lucky with my pulls. In fact, the shiniest card I got was a Hypnosister, a mere Super Rare and not one that’s likely to be very popular in the tournament scene. Every other pack contained only a single rare card and eight commons.

So how did I win the Sealed Event? Well, I should probably preface this with the rules of the event. In this tournament, you are allowed to build a deck with the cards you received from the packs as well as the promo card. You have 46 cards total to work with. But you only need to have 20 cards in your Main Deck. Any Fusion, Synchro, or Xyz Monsters you get must be placed in the Extra Deck. Any cards you don’t put in your Main or Extra Deck are placed in your Side Deck, ignoring the 15 card limit. Players are also allowed to ignore the 3 card rule for deck construction, meaning if you pulled four or more copies of a single card, you are allowed to use all of them. Between Duels in a match, you are allowed to utilize your Side Deck in ways you never could in normal Matches: In addition to switching cards between your Main and Side Decks, you are also allowed to increase or decrease the size of your Main Deck (so long as you never go below 20 cards).  And from my understanding, the changes you make can be permanent.

I took advantage of this format in a way that no one else in the store considered: I stuck to the absolute minimum deck size at all times. You see, I firmly believe in a philosophy when constructing decks: The fewer cards you have, the closer you are to what you need. It’s a simple matter of statistics, really. By using only 20 cards in my Main Deck, I was always much closer to the cards and plays I needed than my opponents were.  On top of that, running only twenty cards would dramatically increase my odds of pulling off certain combos sooner.

But this was only half of my strategy. The other half was to use the most generic cards I pulled, cards whose abilities I could use in the most situations, combining them with one another as well as playing them on their own. I had many cards to consider, both for my own strategy and in accounting for opposing tactics. My main concerns were actually common cards: Superheavy Samurai Swordsman, Superheavy Samurai Blue Brawler, U.A. Perfect Ace from the new Ultra Athlete series, and certain Spells and Traps. The archetypal cards I simply didn’t fear because they could only be best used in a full deck based on the cards they supported.

With all of these things in mind, I chose the following cards for my deck.

Monsters: 17
1x Battleguard King
1x Superheavy Samurai Big Benkei
1x Dragon Horn Hunter
1x Performapal Kaleidoscorp
2x Aria the Melodious Diva
2x Performapal Hip Hippo
2x Sonata the Melodious Diva
1x Gaia, the Mid-Knight Sun
1x Hypnosister
1x Performapal Skeeter Skimmer
1x Performapal Turn Toad
1x Performapal Whip Snake
1x Shaddoll Squamata
1x Superheavy Samurai Swordsman

Spells: 1
1x Hippo Carnival

Traps: 2
1x Battleguard Howling
1x Battleguard Rage

Extra Deck: 2
1x Cloudcastle
1x Pilgrim Reaper

Side Deck: 24
1x Artifact Chakram
1x Artifact Lancea
1x Batteryman 9-Volt
1x Djinn Demolisher of Rituals
*1x Dogu
*1x Gaia, the Polar Knight
**2x Nefarious Archfiend Eater of Nefariousness
*1x Re-Cover
1x Shaddoll Hedgehog
*1x Satellarknight Unukalhai
1x Curse of the Shadow Prison
2x Dracocension
1x Feast of the Wild LV5
2x Hymn of Light
2x Stellarknight Alpha
1x U.A. Stadium
1x Yang Zing Prana
1x Chain Dispel
1x Stellarnova Wave
1x Yang Zing Unleashed

Cards in the Side Deck are marked with stars if they had been swapped in or out during the tournament, with one star per copy used.

When it comes down to it, I didn’t really pull any money cards. I didn’t care that much. I was there to win me a mat, and win a mat I did. Despite lacking any ability to Pendulum Summon, I outperformed everyone there, taking first place and the coolest mat Konami has released thus far. Not that I didn’t earn it, oh no- everybody I faced gave me a run for my money. They all played well and every duel was incredible. So if you’re reading this and faced me, do NOT be discouraged- you were great and made me work for it.

The core strategy was beatdown with a sort of control element. The key cards were the Performapals, with each one giving support to the overall consistency of the deck. Performapal Whip Snake and Performapal Turn Toad both allowed me to take out plenty of monsters in a single turn. Performapal Skeeter Skimmer gave me a solid defense, as well as extra offense when combined with Whip Snake or Turn Toad. Performapal Kaleidoscorp gave a power boost to Gaia, the Mid-Knight Sun and the Melodious Divas, which was very important in this format. Even Performapal Hip Hippo was important and allowed me to recover my footing in many duels by allowing me to sacrifice a monster that had lost its ATK and DEF to Superheavy Samurai Swordsman’s effect for either Superheavy Samurai Big Benkei or Battleguard King, without costing me another monster that hadn’t lost its strength.

Dragon Horn Hunter was always played as a monster, while Kaleidoscorp and Turn Toad were always in the Pendulum Zones. Without a Flash Knight, I had no reason to use Hunter as a Pendulum Spell, but 2300 ATK for a single Tribute was still handy, especially when a Swordsman had weakened one of my monsters. Hypnosister herself was a beatstick, shooting up to 2100 ATK every time I played her by simply having a card in a Pendulum Zone. Squamata was in there primarily to handle Superheavy Samurai Blue Brawler, but 1800 ATK wasn’t a bad move either if I could Flip Summon it. I pulled a single Swordsman, and he served as both defense and offense (when combined with Snake or Toad).

Seventeen monsters to one Spell and two Traps. It might not seem like the most fantastic ratio, but let’s not forget that most of my Spells and Traps just weren’t meant to be used on their own. Take Feast of the Wild LV5. How many Level 5 monsters do you see up there? Two, right? There’s a problem, though: They’re both Fairy-Types, as are all the Artifacts. Incompatible with Feast of the Wild LV5. Another example is Hymn of Light. It’s the Ritual Spell for Saffira, Queen of Dragons. Not a single copy of the monster showed up, so the Ritual Spell was relegated to the Side Deck.

Now, what about Curse of the Shadow Prison? Or Chain Dispel? Surely I could’ve tried those, right? I had considered swapping in Curse in the event that I ran into someone actually using U.A. Stadium, but I highly doubted I could ever utilize the ATK decrease effect, so I didn’t put it in the Main Deck. Chain Dispel was also put to the Side Deck because I wasn’t confident I would ever run into a deck actually running multiple copies of any Spell or Trap Card, and if I did, it wouldn’t be more than two copies.

As for the one Spell and two Traps I DID run, well, it should be fairly obvious why.  Hippo Carnival makes for a fantastic defense, forcing my opponent to attack tokens during the turn that it’s played.  Very handy if I didn’t want a certain monster to be destroyed right then.  And the Traps?  They both support Warrior-Type monsters, and there were actually very few compared to the rest of the deck.  In fact, aside from those in the Side Deck, there were only three Warrior-Type monsters in the Main Deck, and two of them required Tributes to summon.  In spite of this, those two Traps were never dead draws.  Why?  I have the small deck size to thank for that.  Three cards may not seem like a lot, but in 20 cards instead of 40, it’s actually a pretty large number.

Now for the deck size itself.  I know the obvious criticisms.  In fact, one of them was in my Extra Deck: Pilgrim Reaper.  Look, I wasn’t worried about the Reaper because it requires two Level 6 monsters to summon.  I only had two myself.  What were the odds of other people actually being able to summon it?  Not much higher than mine.  And as for actually decking out due to stall, well, I wasn’t worried about that either.  I had Shaddoll Squamata for that.  The only thing that could have been my undoing would have been two copies of Superheavy Samurai Blue Brawler.  I only ever encountered one.  My only other major problem was U.A. Perfect Ace, but I already knew how to deal with that.  It shared a weakness with one of my favorite cards in the game.  I simply had to bluff it out and then destroy it.  Failing that, I could always hit it with Battlegaurd King.

But what if I HAD encountered a Blue Brawler lock?  Well, it’s likely I would have lost that duel, assuming my opponent had more cards in their deck than I did.  I believe I could have come back from it, though.  One duel isn’t the whole match.  I would simply have to try to be faster next time.

I hope you found this article insightful and helpful, and I hope it helps you in the next Sneak Peek event three months from now.  Trust me when I say this: The New Challengers is going to be a REALLY good set!

As for me, stay tuned.  My next article will be covering probably the most confusing card in Duelist Alliance: Superheavy Samurai Big Benkei!

Arc of Light: Swing, Pendulum! Unanswered Questions

Pendulum Monsters are officially on their way!  They were announced and given the rundown on Konami’s official strategy blog, and you can read the article here.  However, there are still a few questions that need to be answered.

Before I get into these yet unsolved mysteries, let me give you a brief rundown of how Pendulum Monsters work.

First, Pendulum Monsters have the border of both a monster and a Spell Card.  This means that you can play them as one or the other.  They also have two text boxes, and special numbers are on the sides of the card.  The smaller text box contains the monster’s Pendulum Effects (if any; some Pendulum Monsters won’t have any Pendulum Effects), which are the effects you get if you play the card as a Spell Card.  The numbers on the sides are called the Pendulum Scale.

So far, there are only Normal and Effect Pendulum Monsters, so this means they go into your Main Deck when you’re building a deck.

Pendulum Monsters can be Normal Summoned or Set from your hand, and can also be Flip and Special Summoned.

The playing field has gotten an upgrade as well: Two new zones now exist on the left and right sides of the field, between the Field Spell and Extra Deck Zones, and the Deck and Graveyard Zones.  These are your two Pendulum Zones.  In order to activate a Pendulum Spell, you play it to one of these two Pendulum Zones.  They are NOT played to your Spell & Trap Card Zones.

Pendulum Spells are Spell Speed 1, as are their effects that activate, unless stated otherwise on the card.

If a Pendulum Card is sent from the field to the Graveyard for any reason, it is placed face-up in your Extra Deck instead.  This happens if it is a monster card (including face-down Pendulum Monsters) or a Spell Card.

Pendulum Summoning is the new summoning method introduced with Pendulum Monsters.  When you have set both sides of the Pendulum Scale by playing a Pendulum Spell to each of your Pendulum Zones, you can perform a Pendulum Summon.  This lets you Special Summon as many monsters as you like, from your hand or Pendulum Monsters face-up in your Extra Deck or both, to your field.  The Levels of your monsters must be BETWEEN the numbers of the Pendulum Scale.  So if you have a scale of 1 and 8, you can summon any monsters from Level 2 to Level 7.  Pendulum Summons can only be done during Main Phase 1 or 2, and can only be used once per turn.  You cannot “save up” Pendulum Summons either.  You get one per turn and that’s it.

So, what are these unanswered questions?  Let’s go over each one, as well as my proposed answers to them.

NOTICE: If you are a Judge reading this, please don’t take any of my answers as being absolute certainties.  They are just speculation at the moment.  When judging an event, please use YOUR OWN best judgment, or follow the rulings issued by your Head Judge.  Do this until we get actual official word from Konami.

1) What happens if a Pendulum Monster is sent from the hand, deck, or Extra Deck to the Graveyard?
A: I believe they will go to the Graveyard.  Everything we’ve seen up to this point has only stated they go to the Extra Deck if they were on the field.

2) What happens if Macro Cosmos is on the field when a Pendulum Card is destroyed?
A: No idea.  There are two ways this can go, and both of them make sense in their own way.  First, they might actually be banished.  The rule states they go the the Extra Deck if they would be sent from the field to the Graveyard, but the Graveyard is inaccessible with Macro Cosmos in play.  ON THE OTHER HAND, they might still go to the Extra Deck, since it is the game itself redirecting them rather than a card effect.  I’m leaning toward this second answer myself based on historical precedent: Synchro Summoning can still be done while Macro Cosmos or other such cards are in play according to the rulebook.

3) Can a Pendulum Spell be Set face-down?
A: I don’t believe they can.  If this is the case, then that’s going to make Anti-Spell Fragrance a really popular Side Deck card…

4) Can the activation of a Pendulum Spell be negated?
A: I don’t see why not.

5) What happens if the Summon of a Pendulum Monster or the activation of a Pendulum Spell is negated?
A: I believe the same thing that would happen if a Pendulum Card is discarded from your hand: It would go straight to the Graveyard.

6) Do Pendulum Cards count as Spells and monsters in your hand and deck?
A: I don’t believe so.  I think they count only as monsters.

7) If I negate a Pendulum Summon, what happens to the monsters that were going to be summoned?  What about the Pendulum Spells?
A: If you were to use, say, Solemn Warning or Black Horn of Heaven to negate a Pendulum Summon, I believe the monsters that would be summoned are destroyed and sent to the Graveyard- including if they were Pendulum Monsters coming from the Extra Deck.  So basically, the same that happens if you use these cards on a Synchro Monster or a Cyber Dragon.  I also believe that ALL of the monsters that would be summoned are destroyed, whether its one or a full five.  As for the Pendulum Spells, nothing happens to them, but you’ve used your Pendulum Summon for the turn so you can’t try again.  (And no, you cannot use Solemn Warning to negate the activation of a Pendulum Spell unless its Pendulum Effect involves Special Summoning on activation; just like you can’t use it on Infernity Launcher).

These are the unanswered questions I was able to think of.  If you have any more, post them in the comments, or email them to me.  Don’t forget to email Konami on July 11th after the official release of Pendulum Monsters!