Big Benkonfusion

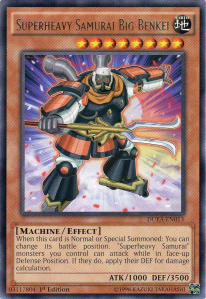
Duelist Alliance officially goes on sale today!  This means that a ton of new and surprisingly good cards are now available for tournament play, such as Chain Dispel, and Yuya Sakaki’s Ace monster Odd-Eyes Pendulum Dragon.  But this post will actually be about different card, one that is sure to cause some confusion.  Say hello to Noboru Gongenzaka’s Ace monster, Superheavy Samurai Big Benkei!

SuperheavySamuraiBigBenkei-DUEA-EN-R-1E

When this card is Normal or Special Summoned: You can change its battle position.  “Superheavy Samurai” monsters you control can attack while in face-up Defense Position.  If they do, apply their DEF for damage calculation.

Older players will immediately be reminded of two older cards: Total Defense Shogun, and Elemental HERO Rampart Blaster.  Both of these cards also have the unique ability to attack while in Defense Position, but there is a key difference between these cards and Big Benkei up there.  The difference is that these cards still use their ATK when attacking in Defense Position, but Big Benkei (and all other Superheavy Samurai in his presence) uses his DEF.

This is where I got hung up, and I don’t doubt a lot of other players experienced the same confusion as me.  What happens if Superheavy Samurai Big Benkei attacks a monster with less ATK or DEF than his own DEF while he’s in Defense Position?  There are two possible answers to this question.

The first possible answer is Big Benkei deals battle damage if the attack target is in Attack Position, but does not destroy it by battle.

The second answer is that Big Benkei will inflict battle damage if the attack target is in Attack Position, but WILL destroy the monster by battle either way.

Only one of these is correct and some of you will be surprised to learn that it’s NOT the first one.  Yep, you read that right.  Big Benkei and his Superheavy allies can and will destroy stuff by battle while attacking in Defense Position, even though they are applying their DEF.  So why is that?

It’s because they’re attacking.  The rules of the game says that a monster can only attack while in Attack Position, and that you apply that monster’s ATK for damage calculation.  Big Benkei bypasses both of these rules, but the one fundamental factor of battle remains unchanged: One monster is attacking, and attacking monsters can destroy other monsters by battle.

It can’t be that simple, can it?  It can.  The rulebook uses the following phrases when detailing the rules for battling.

Each face-up Attack Position monster you control is allowed 1 attack per turn. (Version 8.0, Pg.32)

You calculate Battle Damage based on the battle position of the monster you are attacking. If you attack an Attack Position monster, compare ATK vs. ATK. If you attack a Defense Position monster, compare your monster’s ATK vs. the attacked monster’s DEF.  (Version 8.0, Pg.35, emphasis added)

In addition to that, the first two sections for calculating damage on pages 35 and 36 (Version 8.0) are labeled as follows.

When You Attack an Attack Position Monster (Version 8.0, Pg.35)

When You Attack a Defense Position Monster (Version 8.0, Pg.36)

Finally, the section on direct attacks is as follows.

If there are no monsters on your opponent’s side of the field, you can attack directly. The full amount of your attacking monster’s ATK is subtracted from the opponent’s Life Points as Battle Damage. (Version 8.0, Pg. 36)

What Superheavy Samurai Big Benkei does is essentially rewrite those sections so that you are applying your monster’s DEF instead of ATK.  Nothing else is changed, so everything else about those rules is still applied.  This is a handy way to remember this rule: Just substitute “your attacking monster’s ATK” in the rulebook with “your attacking monster’s DEF”.  Suddenly, his effect is so much easier to understand.

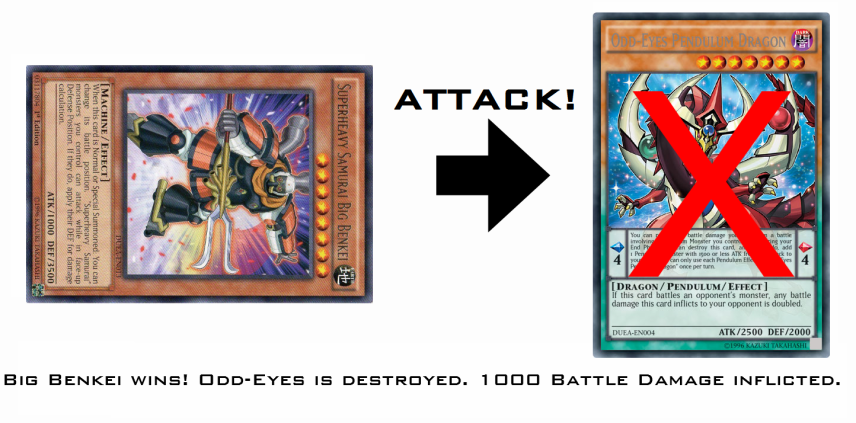
But for those who still don’t quite get it, let me just illustrate it for you.  Let’s say you control Big Benkei in Defense Position, while your opponent controls Odd-Eyes Pendulum Dragon (2500 ATK).  If you attack Odd-Eyes with Big Benkei, Odd-Eyes will be destroyed by battle, and your opponent will take 1000 battle damage.

Benkei vs. Odd-Eyes 1

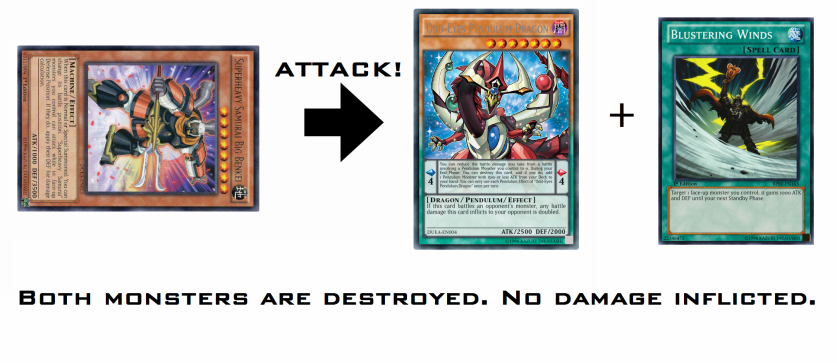
Now let’s say Odd-Eyes has a boost from Blustering Winds.  This puts its ATK at 3500, exactly equal to Big Benkei’s DEF.  If a Defense Position Superheavy Samurai Big Benkei were to attack Odd-Eyes in this situation, both monsters would be destroyed by battle.

Benkei vs Odd-Eyes 2

Well that covers attacking monsters in Attack Position.  But what about monsters in Defense Position?  How does that work?  Pretty much the same way.  If Big Benkei attacks a Defense Position monster with lower DEF than his own, while Benkei himself is in Defense Position, that monster is destroyed, but no battle damage is inflicted.

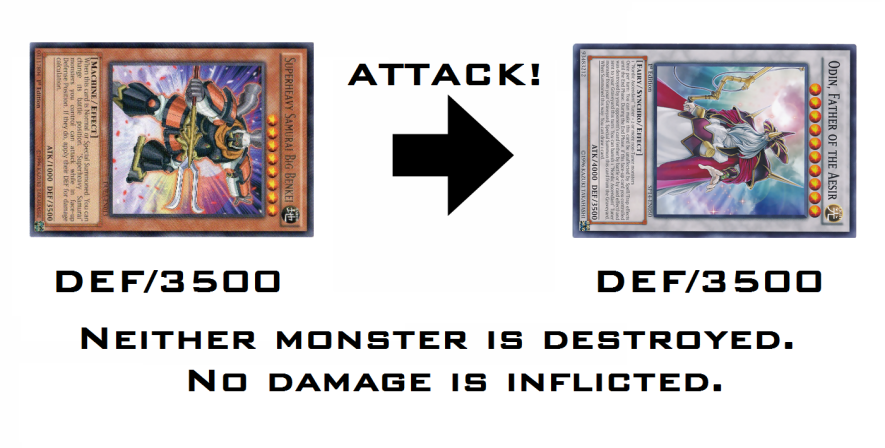
And what if he attacks a monster with the same DEF?  Surely both monsters would be destroyed, right?  Nope.  If he attacks a monster with equal DEF to his own, Big Benkei will be unable to destroy it.  In fact, neither monster is destroyed, and no damage is inflicted.

Benkei vs Odd-Eyes 2

By now, you should have an idea of how this works, but just in case, I will cover one last scenario: If Big Benkei attacks a Defense Position monster whose DEF is higher than his own, neither monster is destroyed, but Big Benkei’s controller will take damage equal to the difference in DEF.

So to summarize once more, when attacking with Defense Position “Superheavy Samurai” monsters while Superheavy Samurai Big Benkei is on the field, just follow the charts on pages 35 and 36 of the rulebook (Version 8.0 as of this writing), using your Superheavy Samurai’s DEF in place of its ATK.

The Superheavy Samurai will be receiving more support in The New Challengers, slated for TCG release on November 7, 2014, so hang in there guys!  In the meantime, I’ll keep looking for stuff to write about.  I’ve already got a particularly interesting idea I’ll be working on, but I’ll keep the details to myself for now.  But if you have any suggestions, then let me know in the comments or by emailing me.

Until next time, keep dueling!

Sealed Strategy: Sneak Peeks

For my newest article, I’d like to focus on something else: Strategy.

This past weekend was the Duelist Alliance Sneak Peek event. At my local store, I participated instead of judging. I’m proud to say that I won the sealed event and earned the prized playmat.

But how I won may come as surprise to many of my readers- it certainly surprised many of the people I defeated, and they are some of the best friends I’ve ever had. You see, I didn’t get very lucky with my pulls. In fact, the shiniest card I got was a Hypnosister, a mere Super Rare and not one that’s likely to be very popular in the tournament scene. Every other pack contained only a single rare card and eight commons.

So how did I win the Sealed Event? Well, I should probably preface this with the rules of the event. In this tournament, you are allowed to build a deck with the cards you received from the packs as well as the promo card. You have 46 cards total to work with. But you only need to have 20 cards in your Main Deck. Any Fusion, Synchro, or Xyz Monsters you get must be placed in the Extra Deck. Any cards you don’t put in your Main or Extra Deck are placed in your Side Deck, ignoring the 15 card limit. Players are also allowed to ignore the 3 card rule for deck construction, meaning if you pulled four or more copies of a single card, you are allowed to use all of them. Between Duels in a match, you are allowed to utilize your Side Deck in ways you never could in normal Matches: In addition to switching cards between your Main and Side Decks, you are also allowed to increase or decrease the size of your Main Deck (so long as you never go below 20 cards).  And from my understanding, the changes you make can be permanent.

I took advantage of this format in a way that no one else in the store considered: I stuck to the absolute minimum deck size at all times. You see, I firmly believe in a philosophy when constructing decks: The fewer cards you have, the closer you are to what you need. It’s a simple matter of statistics, really. By using only 20 cards in my Main Deck, I was always much closer to the cards and plays I needed than my opponents were.  On top of that, running only twenty cards would dramatically increase my odds of pulling off certain combos sooner.

But this was only half of my strategy. The other half was to use the most generic cards I pulled, cards whose abilities I could use in the most situations, combining them with one another as well as playing them on their own. I had many cards to consider, both for my own strategy and in accounting for opposing tactics. My main concerns were actually common cards: Superheavy Samurai Swordsman, Superheavy Samurai Blue Brawler, U.A. Perfect Ace from the new Ultra Athlete series, and certain Spells and Traps. The archetypal cards I simply didn’t fear because they could only be best used in a full deck based on the cards they supported.

With all of these things in mind, I chose the following cards for my deck.

Monsters: 17
1x Battleguard King
1x Superheavy Samurai Big Benkei
1x Dragon Horn Hunter
1x Performapal Kaleidoscorp
2x Aria the Melodious Diva
2x Performapal Hip Hippo
2x Sonata the Melodious Diva
1x Gaia, the Mid-Knight Sun
1x Hypnosister
1x Performapal Skeeter Skimmer
1x Performapal Turn Toad
1x Performapal Whip Snake
1x Shaddoll Squamata
1x Superheavy Samurai Swordsman

Spells: 1
1x Hippo Carnival

Traps: 2
1x Battleguard Howling
1x Battleguard Rage

Extra Deck: 2
1x Cloudcastle
1x Pilgrim Reaper

Side Deck: 24
1x Artifact Chakram
1x Artifact Lancea
1x Batteryman 9-Volt
1x Djinn Demolisher of Rituals
*1x Dogu
*1x Gaia, the Polar Knight
**2x Nefarious Archfiend Eater of Nefariousness
*1x Re-Cover
1x Shaddoll Hedgehog
*1x Satellarknight Unukalhai
1x Curse of the Shadow Prison
2x Dracocension
1x Feast of the Wild LV5
2x Hymn of Light
2x Stellarknight Alpha
1x U.A. Stadium
1x Yang Zing Prana
1x Chain Dispel
1x Stellarnova Wave
1x Yang Zing Unleashed

Cards in the Side Deck are marked with stars if they had been swapped in or out during the tournament, with one star per copy used.

When it comes down to it, I didn’t really pull any money cards. I didn’t care that much. I was there to win me a mat, and win a mat I did. Despite lacking any ability to Pendulum Summon, I outperformed everyone there, taking first place and the coolest mat Konami has released thus far. Not that I didn’t earn it, oh no- everybody I faced gave me a run for my money. They all played well and every duel was incredible. So if you’re reading this and faced me, do NOT be discouraged- you were great and made me work for it.

The core strategy was beatdown with a sort of control element. The key cards were the Performapals, with each one giving support to the overall consistency of the deck. Performapal Whip Snake and Performapal Turn Toad both allowed me to take out plenty of monsters in a single turn. Performapal Skeeter Skimmer gave me a solid defense, as well as extra offense when combined with Whip Snake or Turn Toad. Performapal Kaleidoscorp gave a power boost to Gaia, the Mid-Knight Sun and the Melodious Divas, which was very important in this format. Even Performapal Hip Hippo was important and allowed me to recover my footing in many duels by allowing me to sacrifice a monster that had lost its ATK and DEF to Superheavy Samurai Swordsman’s effect for either Superheavy Samurai Big Benkei or Battleguard King, without costing me another monster that hadn’t lost its strength.

Dragon Horn Hunter was always played as a monster, while Kaleidoscorp and Turn Toad were always in the Pendulum Zones. Without a Flash Knight, I had no reason to use Hunter as a Pendulum Spell, but 2300 ATK for a single Tribute was still handy, especially when a Swordsman had weakened one of my monsters. Hypnosister herself was a beatstick, shooting up to 2100 ATK every time I played her by simply having a card in a Pendulum Zone. Squamata was in there primarily to handle Superheavy Samurai Blue Brawler, but 1800 ATK wasn’t a bad move either if I could Flip Summon it. I pulled a single Swordsman, and he served as both defense and offense (when combined with Snake or Toad).

Seventeen monsters to one Spell and two Traps. It might not seem like the most fantastic ratio, but let’s not forget that most of my Spells and Traps just weren’t meant to be used on their own. Take Feast of the Wild LV5. How many Level 5 monsters do you see up there? Two, right? There’s a problem, though: They’re both Fairy-Types, as are all the Artifacts. Incompatible with Feast of the Wild LV5. Another example is Hymn of Light. It’s the Ritual Spell for Saffira, Queen of Dragons. Not a single copy of the monster showed up, so the Ritual Spell was relegated to the Side Deck.

Now, what about Curse of the Shadow Prison? Or Chain Dispel? Surely I could’ve tried those, right? I had considered swapping in Curse in the event that I ran into someone actually using U.A. Stadium, but I highly doubted I could ever utilize the ATK decrease effect, so I didn’t put it in the Main Deck. Chain Dispel was also put to the Side Deck because I wasn’t confident I would ever run into a deck actually running multiple copies of any Spell or Trap Card, and if I did, it wouldn’t be more than two copies.

As for the one Spell and two Traps I DID run, well, it should be fairly obvious why.  Hippo Carnival makes for a fantastic defense, forcing my opponent to attack tokens during the turn that it’s played.  Very handy if I didn’t want a certain monster to be destroyed right then.  And the Traps?  They both support Warrior-Type monsters, and there were actually very few compared to the rest of the deck.  In fact, aside from those in the Side Deck, there were only three Warrior-Type monsters in the Main Deck, and two of them required Tributes to summon.  In spite of this, those two Traps were never dead draws.  Why?  I have the small deck size to thank for that.  Three cards may not seem like a lot, but in 20 cards instead of 40, it’s actually a pretty large number.

Now for the deck size itself.  I know the obvious criticisms.  In fact, one of them was in my Extra Deck: Pilgrim Reaper.  Look, I wasn’t worried about the Reaper because it requires two Level 6 monsters to summon.  I only had two myself.  What were the odds of other people actually being able to summon it?  Not much higher than mine.  And as for actually decking out due to stall, well, I wasn’t worried about that either.  I had Shaddoll Squamata for that.  The only thing that could have been my undoing would have been two copies of Superheavy Samurai Blue Brawler.  I only ever encountered one.  My only other major problem was U.A. Perfect Ace, but I already knew how to deal with that.  It shared a weakness with one of my favorite cards in the game.  I simply had to bluff it out and then destroy it.  Failing that, I could always hit it with Battlegaurd King.

But what if I HAD encountered a Blue Brawler lock?  Well, it’s likely I would have lost that duel, assuming my opponent had more cards in their deck than I did.  I believe I could have come back from it, though.  One duel isn’t the whole match.  I would simply have to try to be faster next time.

I hope you found this article insightful and helpful, and I hope it helps you in the next Sneak Peek event three months from now.  Trust me when I say this: The New Challengers is going to be a REALLY good set!

As for me, stay tuned.  My next article will be covering probably the most confusing card in Duelist Alliance: Superheavy Samurai Big Benkei!